Troubleshooting From Capture to Database Creation

Please walk through the checks within the below PDF file on your Zeek and AC-Hunter systems. If any of them fail or you’re getting errors of some form, please get in touch with support at https://portal.activecountermeasures.com/support/support-request/ . Please describe the check that failed and include the program output and errors (if any).


Troubleshooting_From_Capture_to_Database_Creation.pdf


Direct Link to this FAQ Item: https://portal.activecountermeasures.com/support/faq/?Display_FAQ=8241

Read More

Corelight@Home Sensors Don’t Seem to Send Any Logs Over to AC-Hunter

The Corelight@home package appears to save its hourly logs in an uncompressed format by default. To change this to the compressed logs that AC-Hunter is expecting, please do the following:

sudo nano /etc/corelight-softsensor.conf

(You’re welcome to use a different editor than nano.) Search down through the file (with ctrl-w) for the characters gzip . You should find this line:

Corelight::batch_log_gzip F

Please change the capital F to a capital T:

Corelight::batch_log_gzip T

Please save and exit. Now you’ll need to restart the corelight@home suite:

systemctl restart corelight-softsensor.service

Logs created from this point on should be compressed by default, allowing AC-Hunter to find the compressed logs it expects. You should have a new database for this system within a few hours.


Direct Link to this FAQ Item: https://portal.activecountermeasures.com/support/faq/?Display_FAQ=7684

Read More

Changing the Interfaces on Which Zeek Listens

We include a tool that asks “What interface would you like to listen on” inside the docker container. While it runs automatically on first boot, it’s by no means obvious how to rerun it to listen on multiple interfaces.

First, get a list of the interfaces on which you wish to listen with “ifconfig -a”. You will generally ignore interfaces whose names start with “docker”, “lo”, “br”, and “veth”; the likely ones usually start with “eth” or “en”. Look at the values next to “RX packets” and “TX packets” (or “RX bytes” and “TX bytes”); interfaces connected to a span/tap/mirror/copy port will almost always have very high values next to “RX”, and little or no traffic next to “TX”. Jot down the interface name(s) as you’ll want to check this/these interfaces when you run zeekcfg next.

As a side note, interfaces through which you route normal traffic (such as your default route interface seen with ” route -n | grep ‘^0\.0\.0\.0’ “) are very unlikely to be connected to a sniffer port on your switch.

You’ll need to run the following command on your Zeek sensor. While it may be wrapped here, the command needs to be on a single line with spaces replacing linefeeds .

docker run --rm -it --network host --mount source=/opt/zeek/etc/node.cfg,destination=/node.cfg,type=bind "activecm/zeek:latest" zeekcfg -o /node.cfg --type afpacket --processes 0 --no-pin

If it’s easier to enter it as 4 separate lines, the following block is the same command as the above; just don’t put any characters after the backslashes on the first 3 lines.

docker run --rm -it --network host \
--mount source=/opt/zeek/etc/node.cfg,destination=/node.cfg,type=bind \
"activecm/zeek:latest" \
zeekcfg -o /node.cfg --type afpacket --processes 0 --no-pin

This program will ask which interface(s) you want to sniff on; select each one connected to a mirror port. Finally, we recommend restarting the system to make sure that Zeek uses the new configuration file.


Direct Link to this FAQ Item: https://portal.activecountermeasures.com/support/faq/?Display_FAQ=3914

Read More

I Have a Corelight Sensor. What Do I Do to Make It Work with AC-Hunter?

I have a Corelight sensor. What do I do with it to make it work with AC-Hunter?

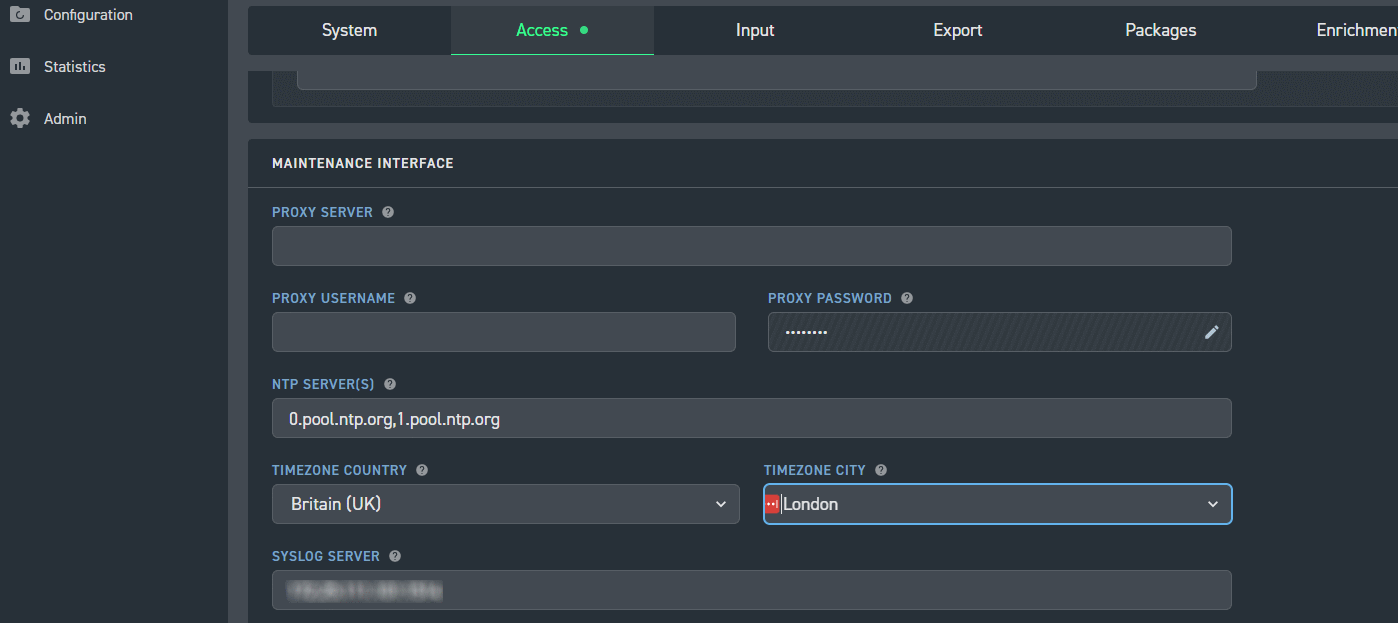
1. Set the time zone on the sensor to UTC/GMT or Britain [UK]/London depending upon your available options:

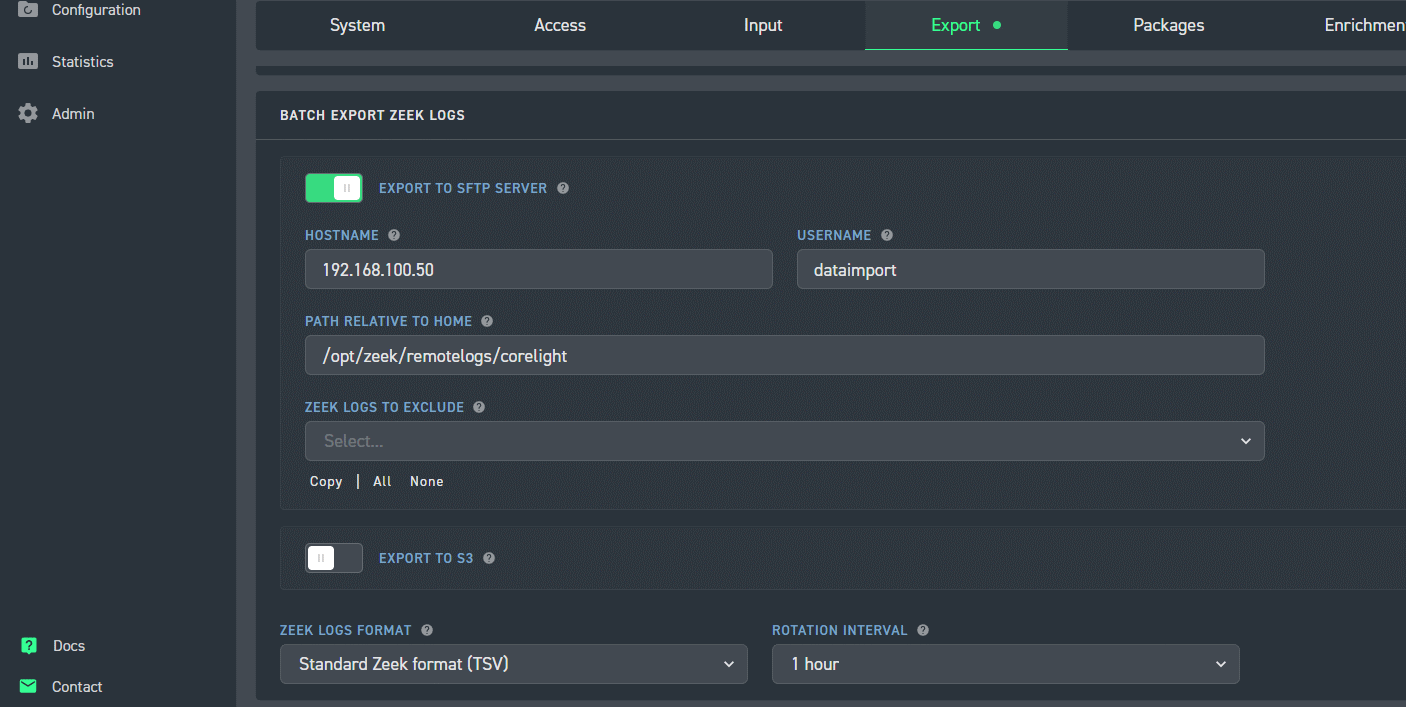
2. Configure the Corelight sensor to export its Zeek logs to your AC-Hunter box over SFTP.

a. When asked for a hostname to send the logs to, put in the IP address or hostname of your AC-Hunter box. (The sensor should be able to place outgoing ssh (tcp port 22) connections to this hostname/IP).

b. The Username to use is “dataimport”.

c. Ask the Corelight sensor to send the logs to /opt/zeek/remotelogs/sensorname/ , where sensorname is the name of this Corelight sensor, made up of the following characters and 52 characters or less: a-z A-Z 0-9 _ ^ + =

d. The Zeek log format to use is “Standard Zeek format (TSV)”.

e. The Rotation interval should be 1 hour.

f. The sensor will generate an SSH key to use; append the key to the file /home/dataimport/.ssh/authorized_keys on your AC-Hunter box.

g. Once your Corelight sensor has sent over one set of logs, find the directory that holds the logs on the AC-Hunter box. In the above example where we ask for the files to be placed under /opt/zeek/remotelogs/sernsorname/ , Corelight will actually place them under /home/dataimport/opt/zeek/remotelogs/sensorname/logs/ . To make them show up in the right directory, edit /etc/fstab with the following (substitute your favorite editor):

sudo vi /etc/fstab

Add the following line, replacing both instances of the sensorname and making sure the first directory matches where Corelight sends the logs:

/home/dataimport/opt/zeek/remotelogs/sensorname/logs/ /opt/zeek/remotelogs/sensorname/ none defaults,bind 0 0

Save the file and exit.

h. Please run the following commands, substituting your actual Sensor name for sensorname :

sudo mkdir -p /home/dataimport/opt/zeek/remotelogs/sensorname/logs/
sudo chown -R dataimport.dataimport /home/dataimport/opt/zeek/remotelogs/sensorname/logs/

i. Reboot – the reboot step is required here.

j. If you’re not able to do the above for some reason, contact [email protected] and ask them to connect the upload directory to the directory where the logs are being placed.


Read More

Are Packets Arriving at My Zeek Instance?

To check that your span port is correctly feeding data to Zeek, first install tcpdump,

Installing tcpdump (This package is provided in all supported Linux distributions.)

On Debian and Ubuntu Linux, run:

sudo apt-get -y install tcpdump

On Centos, RHEL, or Fedora Linux, run:

sudo yum -y install tcpdump

then run the following, replacing {ethernet_port} with the name of your network card on which Zeek is listening:

tcpdump -i {ethernet_port} -c 100 -qtnp

If you see no output at all, press ctrl-c to kill the program and check that the network card is correctly connected to the span port on your switch.


Read More

Can I Send Zeek Logs from an Existing Zeek Sensor to AC-Hunter to Be Analyzed?

Yes.


  1. Log in to your Zeek sensor as a user that can read the Zeek logs and can run commands under sudo
  2. Run the following command.  You’ll need to replace “my.achunter.system” with the hostname or ip address of your AC-Hunter system.  “[/zeek/log/top/dir/]” is an optional parameter pointing at the top level directory under which your Zeek logs can be found.  You only need to specify this if it’s not automatically detected.
    curl -fsSL https://raw.githubusercontent.com/activecm/zeek-log-transport/master/connect_sensor.sh -O
    
    curl -fsSL https://raw.githubusercontent.com/activecm/shell-lib/master/acmlib.sh -O
    
    curl -fsSL https://raw.githubusercontent.com/activecm/zeek-log-transport/master/zeek_log_transport.sh -O
    
    bash connect_sensor.sh my.achunter.system [/zeek/log/top/dir/]
  3. If you wish to send your logs to a second AC-Hunter system, repeat step 2 using the second system name or IP address.


Note; common directories that hold Zeek logs include:

/opt/zeek/logs/ #Zeek as installed by Rita
/usr/local/zeek/logs/ #Zeek default
/var/lib/docker/volumes/var_log_zeek/_data/ #Blue Vector
/nsm/zeek/logs #Security Onion
/storage/zeek/logs/


Read More

Troubleshooting Log Transfer

The logs for each machine get placed in a different directory on the AC-Hunter system for each Zeek sensor. They should be under /opt/zeek/remotelogs/{zeek_sensor_name}/ , with additional directories under that for each calendar day (such as /opt/zeek/remotelogs/zeek1__1921681213/2021-04-01/).

Please log in to your Zeek system as the user under which you installed Zeek and make sure you can ssh to the AC-Hunter system with:

ssh [email protected] -i "$HOME/.ssh/id_rsa_dataimport" 'echo Successfully connected.'

The “Successfully connected.” response should come back without having to enter a password; if you are asked for a password there’s something wrong with the ssh key setup.

As that same user on the Zeek sensor, please run:

/usr/local/bin/zeek_log_transport.sh --dest ACH.IP.ADDRESS --localdir /opt/zeek/logs/

Replace ACH.IP.ADDRESS with the address of the AC-Hunter system. If your logs are stored somewhere other than /opt/zeek/logs/ on this sensor, adjust that too. This should start sending logs over to the AC-Hunter system. It’s OK to leave this running; any files you successfully transfer now will not be resent later.

Please check the file that initiates sending logs:

cat /etc/cron.d/zeek_log_transport

It should look like the following:

5 * * * * senduser /usr/local/bin/zeek_log_transport.sh --dest ACH.IP.ADDRESS --localdir /opt/zeek/logs/

“senduser” will need to be the account name on this system under which you did the installation, “ACH.IP.ADDRESS” should be the AC-Hunter system’s IP, and “/opt/zeek/logs/” will need to be the directory where you have Zeek logs on this system.


Read More

Change Zeek Sensor Name (and its database name in AC-Hunter)

By default we name a sensor “hostname__ipaddress”. If you want to force a name for a sensor, edit /etc/rita/agent.yaml on the Zeek sensor. Here are the commands to use as the file and its parent directory may not exist:

sudo mkdir -p /etc/rita
sudo vim /etc/rita/agent.yaml

Feel free to use any editor in place of vim, above. You’ll need to add a line to that file of this form:

Name: custom_sensor_name

The only characters you can use for the name are upper and lowercase letters, digits, the underscore, caret, plus and equals. The entire name needs to be 52 characters or less.
Here’s a sample:

sudo cat /etc/rita/agent.yaml
Name: zeek_sensor_A17


Read More